Honda Pilot - Honda Pilot Forums banner
21 - 40 of 73 Posts
Need your help with actuator

Okay, I'm trying to replace my 2003 Pilot's driver's door actuator. The instructions in this thread have been very helpful, but I still need help!!

I was able to get access by removing the door panel, etc. Even got the 3 door latch screws out without too much problem. (used a #3 Phillips head bit on an 18" breaker bar.) I removed the window channel and disconnected the 2 electrical connections to the actuator. But, then I couldn't figure out how to get the door latch/actuator actually out of the car. How do I disconnect the wire latches that connect to the door lock and the door handle? And it seemed like something else was connected to it as well. It's tough to see in there and I was afraid to pull too hard on the metal rods as to not break anything. After an hour, I gave up and put everything back together.

Can someone give me instructions on what has to be physically disconnected from the lock/actuator assembly to get it out of the car? And, how to disconnect them? Those plastic clips that hold the metal connecting rods look pretty fragile. I tried and tried, but for the life of me, I couldn't get any of them disconnected.

Any help would be much appreciated! And would make me look good in my wife's eyes again!

Vic in NC
 
Just completed the the right front and right rear doors. It took a couple of hours. Fiddly, sometimes you need an extra hand, but not too difficult. At first I didn't think I'd remember where all the rods connected to but it was all pretty logical.

I was a little surprised that the three screws came out easy and the inside of the doors looked like they'd been worked on. Then I remembered we'd had body work done on that side a few years ago after a crazy driver hit us from the rear and scraped himself all down that side.

Thanks for all the write ups guys, my wife is happy to have all doors centrally locking and unlocking.

btw I also have a door handle that doesn't spring back into place when opened. The door opens and closes and locks and unlocks but I suspect there's a spring broken inside somewhere. Anyone have a "how to"? Does that sould like I need a whiole new door handle?

Thanks guys
 
Okay, I'm trying to replace my 2003 Pilot's driver's door actuator. The instructions in this thread have been very helpful, but I still need help!!

I was able to get access by removing the door panel, etc. Even got the 3 door latch screws out without too much problem. (used a #3 Phillips head bit on an 18" breaker bar.) I removed the window channel and disconnected the 2 electrical connections to the actuator. But, then I couldn't figure out how to get the door latch/actuator actually out of the car. How do I disconnect the wire latches that connect to the door lock and the door handle? And it seemed like something else was connected to it as well. It's tough to see in there and I was afraid to pull too hard on the metal rods as to not break anything. After an hour, I gave up and put everything back together.

Can someone give me instructions on what has to be physically disconnected from the lock/actuator assembly to get it out of the car? And, how to disconnect them? Those plastic clips that hold the metal connecting rods look pretty fragile. I tried and tried, but for the life of me, I couldn't get any of them disconnected.

Any help would be much appreciated! And would make me look good in my wife's eyes again!

Vic in NC
In case you still have to do this, I found that if you turn the clip approx 90 degrees the rod always pushed out easily.
 
2007 pilot - rear right door lock actuator replacement tips

I replaced the rear right door actuator on one of my two 2007 exl res pilots today. Big thanks to all the contributors who paved the way. These comments are meant to be supplemental to what's already here.

Dealer wanted $366 incl tax. I got OEM part # 72115-S6A-J01 (right rear) via 3-day fedex from OEMAcuraParts.com for $65 incl tax/shipping. $301 remains in my pocket. (left rear actuator for my pilot is a diff part number: 72155-S5P-A11... and $10 cheaper for some reason.) If you choose, for only about $10 more each, you can buy the entire lock/actuator mechanism already assembled... guess that saves you not having to worry about the mechanism coming apart as you replace the actuator, but it's really not that bad. I went with just the actuator.

This was only my second "moderate" (for me) auto maint task (I previously changed a broken foglight-- sounds simple, but removing the entire bumper cowling to get to it kinda freaked my wife out). I'd put the actuator replacement as a 7/10 for difficulty and the foglight as a 4/10 (if you attempt the foglight, buy the right clip removal tool online!) I'm handy when it comes to home reno stuff, but never do much auto mechanical.

My observations:

Tools: all I really used was my cordless impact driver (see below), large and small phillips screwdriver, small flathead screwdriver, and a flashlight. Also a plastic door trim removal bar (suggest buying a trim removal kit-- they're cheap and handy for removing interior trim that you don't want to scratch)-- but a rigid putty knife would probably work as well.

1. removing the lock arm/bar from the inside door handle/opener: highly recommend flipping your child safety lock to ON (located inside the doorjam near the 3 lock mechanism screws). This extends that arm another 1/2" toward the handle, making it much easier to take apart and reassemble. I also suggest taking pics of the way all the arms attach to each of the various components (the inside handle, the lock knob, and up inside the door where the exterior handle connects.)

2. removing the cupholder/window control piece... I pulled on the inside of the cup holder and it popped out easily. Disconnect the window switch wirebundle and set the piece aside.

3. I removed the vapor barrier plastic very slowly keeping the rubbery caulk stuck to the plastic... some videos on youtube show the tech ripping the sucker down... but if you go slowly, it won't tear and the caulk still had enough tack to reseal it nicely. So go easy. Like others, I pulled it about 1/3 down, starting from the upper corner near the "lock knob"

4. Initially, I removed the 3 lock mechanism screws before removing the arms, but ended up putting the lock screws back in so I wouldn't have to hold the assembly inside the door. So I say disconnect all the arms and wires from the lock/act mech first.

5. the arm connecting to the exterior door handle was toughest for me to get disconnected... it is way up inside the door and tough to get your hand in there. Like the other arms it separates up where there's a white (in my case) plastic connector from the end of the arm to the ext handle mechanism. If flips open like the pink ones on the other components. The rest of the arm stays connected to the lock assembly.

6. I completely removed the arm that goes from the int handle to the lock mech. But photographed the position before removing the arm at the lock side, so I'd get it back together correctly. Good thing they have a little round window for you to look through as you're reconnecting.

7. re: the dreaded "3 lock screws" that come installed very tight from the factory... I used my 18v cordless DeWalt impact driver. That was the right tool for the job. Piece of cake with this and a #3 phillips.

8. to get the lock/actuator assembly out of the door, I did NOT remove the bolts to the window track, but DID have to separate the longish white plastic "door rod protector" piece (that guides the knob arm) from the lock/actuator assembly. Like other folks, it then took some time to figure out how to rotate the sucker around to get it out. Bit of a puzzle. In the end, mine went pretty much straight down staying on the inside (toward interior of car) of the window guide rail.

9. like others have said, be VERY careful when separating the actuator from the lock mechanism. I strongly rec taking lots of pics from different angles before you start fiddling with it. And bring it inside, so if someting falls apart you don't lose anything. Like others, I removed the one screw and removed the silver plate very very carefully (so the child safety rocker didn't come apart.) Use your small flathead screwdriver for this. Then you'll be able to separate your dead actuator and put the new one on.

Victory! Now reassemble then crack a cold one. Good luck.
 
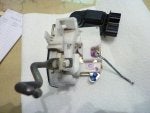
I had the rear passenger lock on my 2003 Pilot EXL fail. I purchased a new actuator, and did pretty well until I got to the part of actually getting the mechanism out of the door. Once I got it out I had the unfortunate experience of having the child lock mechanism come apart - and I had no pictures. After a couple of hours I figured out how to put it back together. The Honda diagrams were worthless. So to save someone else the trouble, here are some pictures of the working mechanism.

Image


Good Luck!
 
@dwains It doesn't look like your photo got attached? I think having a couple photos of the working mechanism would be invaluable to this thread.

My friend and I replaced my rear right door actuator on my '03 Pilot last night. Those 3 screws came off fairly easily with using a hair dryer on each one for a little over a minute on each one. Just let the screws fall to the ground as they are going to be hot. Getting the assembly out is difficult at first. The next part can not be overstated ... once the assembly is coming out put all your hands on it and your friends hands to make sure the parts don't fall/shoot everywhere. Then carefully set it down and take lots of photos. Our parts fell apart everywhere. Had everything stayed together the project would have taken 90min, but we had to figure out how all the gears worked together. So the final project took just over 2.5 hours. My friend got very good and taking out and putting back in the assembly to test if the gears were configured correctly. If you're not mechanically minded then you will likely give up when the gears fall apart and then take it to the dealer to be careful. My friend and I as a team could probably do a future door in 40min. I would never want to tackle this project alone. I'm sorry we didn't get photos of the assembly. After 2.5 hours of beastly hot temps in my garage we were just happy to be wrapping up the project. I bought the passenger rear door lock actuator from Rock Auto for $28.79. Part number: 746301 (746-301).
 
Just replaced both passenger side actuators today. The hardest part was getting the three screws out - I bent the sheet metal & had to bend it back once I got them out. Now the locks work fine!
 
I replaced my RR this week but instead of just the actuator I replace the latch assembly witch comes with the actuator, no need to take the latch apart to replace the actuator and the price was only $20.00 more. Three screws were soaked with WD-40 for an hour and they were no problem coming out.
 
'03 Pilot. I didn't see all the tips here regarding the screws prior to diving into this project. Stripped the screws (used a Reed Prince, but apparently the screws are in tighter than t-shirts at a gym), so I went out and bought a impact driver, and screw extractors. First screw: extractor broke off inside the screw.

Fast forward: I've now purchased a titanium-plated drill bit set, along with another set of screw extractors. First screw: tried drilling through the previous bit (no way it's coming out), but not making much progress. Second screw, got the Grabit bit to go in, but now there's a nice gaping hole and screw is still not out.

It might be that the winter weather here (DC), coupled with some stupid luck and lack of experience have put me in this situation, and I'm now seriously debating my next steps. I did purchase a heat gun, so that's next on the list. I've tried JB and WD40 to no avail, and I'm just hoping that I'll have some better luck tomorrow :(.
 
Possible actuator needs replaced.

Just recently I noticed my car will not beep it horn when I lock the doors and set the alarm. I noticed that the drivers door did not lock but all the lights in my 2003 pilot turned off. I locked the door manually and tried to unlock the car with my fob but it will only flash my headlights and my dash light and not lighting up my dome lights and will not unlock any of my doors. I think this is a problem with my drive side actuator but I have just replaced half of my dome lights with LED's. The only reason I think this is because I cant unlock any of my doors with the fob or set the alarm.
 
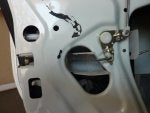
i am stuck on step 5 - i can't figure out which way to swing the plastic clip to release the rod and push it out. i've looked at the diagrams and they don't really show direction. the pink clips were much more intuitive than the white one for the exterior door handle. any additional thoughts/pictures/comments?
 
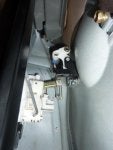
It is real snug. pry it upwards if you have strong fingers or use a long flat head screwdriver throug the round hole in the first pic. When it's loose, you still need to push the rod out of the white plastic piece. use a philips screwdriver to push it out but be careful not to break the white piece, use the flat screwdriver through the round hole to secure it in place while you push out the rod. good luck.
 

Attachments

I took the door panel off and worked on getting the actuator out of the driver's front door. I looks like the recent pictures are of a different door, or maybe newer model Pilot? I have an '03.

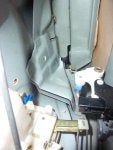
I was able to get the interior door handle rod (with the blue clip) out of the assembly. There are at least two more rod that I couldn't get out, though. The interior door lock up/down knob (with orange marking), appears to go through the door lock assembly, and twist. I have no idea how you would get that one off. I guess the others need to be freed up first, then you twist the whole thing?

Then there is a rod (similar to that in the previous post's pictures), where there is a brass rod with white plastic pieces, and a small piece of brass sticking out of the middle. How is this one removed??

This is a tough project because you can't see what you're doing and it's tight. Trying to use a mirror and work backwards in a tight space is frustrating! I am thinking about taking the actuator I bought and going to my local mechanic.
 
hope this helps. The previous photos are from left rear door '03 .
Thanks for posting. Still not enough detail on how to take things apart.

I broke down and called the $tealer. They want $207 to install the actuator that I already purchased. I also had to buy the trim piece by the mirror, because that self-destructs when you remove it (two clips broke right off). :28:
 
Yes, Please....

Finally got mye two rear actuators replaced. I had to remove the left side one to make sure I put the right side one back together correctly after it fell apart during repalcement, then continued with the left side replacement. As for the three screws holding the latch to the door, after reading these posts (and nearly stripping the first screw with a #2 phillips head screwdriver), I went to Home Depot and purchased a #3 phillips bit ($4) and a Ryobi impact drill/driver ($69). I sprayed some WD 40 onto the screw heads, let it seep in for a minute, and pushed hard on the screw with the impact drill and let it do its magic. Took about 5 seconds for each screw, but they then came out easlily. Never using an impact drill before, but am now a convert. First actuator took about three hours to replace, next two about 35 minutes each. My thanks to the original poster for the pictures and tips; I would be glad to help with any insights I learned if anyone is attempting the replacement of the actuators (front and back).
Chuck, what did you find out when you compared the left side with the right side? I realize it has been a while, but I'm where you were at with the metal pieces coming apart while changing out the locking actuator. I'm stumped. Any help would be appreciated.
 
Having replaced both front drivers and passenger door actuators on my 2004 Honda pilot, I have some advice that isn't related in this thread (maybe the designs changed a little from 2003 to 2004 or who knows).

Steps:

After removing the door panel:

1) unscrew the fastener that holds the manual door lock plunger cover (it is white) with a philips screwdriver. Remove the cover (it covers the plunger, probably to keep people from using a hanger to loop it and unlock the car.

2) Undo the 10mm fastener that bolts the window guide, remove window guide. Use a mirror to look how the window guide seats so you can re-seat it when you reassemble. You life will be total hell unless you remove the window guide.

3) A note on those 3 phillips bolts. I was able to undo them with a large handled screwdriver and putting two hands on the screwdriver handle.

4) There are 4 rods that connect to the actuator assembly. Two rods go up and mate to the door lock key mechanism. One rod connects to the inside door lock latch, and the last rod is the locking rod that has the plastic end to it with the red fluorescent tab on it indicating the door is locked/unlocked.

5) The difficult ones to remove are the two rods that connect the key lock mechanism. One of them is not too bad, as you rotate 90 degrees the plastic retainer and pull on it till it pops out. The other one is the hardest. If you look through the door itself, there is a hole that you can look through to visualize how that rod is situated (might need to shine a flashlight). Looking through the whole, you can guide your hands to pop off that rod (also need to look through there for reassembly). Note that this rod has no plastic retainer (it just pops out), but it is a little difficult to do, I used a small flathead screwdriver to pop it out.

I hope that helps someone. I am sorry I didnt take any pictures.

Alex
 
21 - 40 of 73 Posts