

Hi everyone
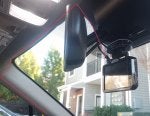
I am a fellow pleasant purveyor of a 2017 AWD Touring and Hardwire Installed a Lucas front + rear dashcam.
Photos with details attached
- The model I have also has parking mode / surveillance when the car is off + voltage over-drain safeguards.
- Did NOT need a 12v to 5v in-line convertor for this dash cam model - be aware that you may need one for other models and manufacturers.
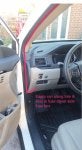
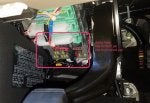
- Hard wired directly into driver side fuse box (1 accessory power and 1 constant power).
- Highly recommend an add-a-fuse kit (i used 2).
- The pilot uses low-profile mini fuses, Not regular mini fuses (the metal prongs sit flush with the plastic casing on the fuses)
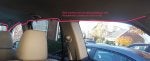
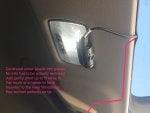
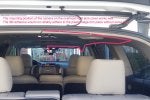
- Running the wires was a breeze - No trim pieces had to be fully removed. Gently lifted some of the rear trunk roof pieces to snake the rear dash cam wire through.
- Mounted the rear dash cam to the trunk cabin light lens (3M adhesive would not stick well to the regular plastic roof trim) - no regrets, very pleased.
**Other Details of our vehicle**
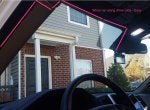
- mud guards + door edge guards + wheel locks + moon roof visor
- Kensun HID Headlights 35w 5000k with Relay Harness
- MaxLiner floor liners (very pleased)
- DIY clear 3M headlight protectors
- DIY clear 3M rear bumper applique / protector
- white LEDs for reverse lights + cabin lights
![]()
![]()
![]()
![]()
![]()
![]()
![]()
I am a fellow pleasant purveyor of a 2017 AWD Touring and Hardwire Installed a Lucas front + rear dashcam.
Photos with details attached
- The model I have also has parking mode / surveillance when the car is off + voltage over-drain safeguards.
- Did NOT need a 12v to 5v in-line convertor for this dash cam model - be aware that you may need one for other models and manufacturers.
- Hard wired directly into driver side fuse box (1 accessory power and 1 constant power).
- Highly recommend an add-a-fuse kit (i used 2).
- The pilot uses low-profile mini fuses, Not regular mini fuses (the metal prongs sit flush with the plastic casing on the fuses)
- Running the wires was a breeze - No trim pieces had to be fully removed. Gently lifted some of the rear trunk roof pieces to snake the rear dash cam wire through.
- Mounted the rear dash cam to the trunk cabin light lens (3M adhesive would not stick well to the regular plastic roof trim) - no regrets, very pleased.
**Other Details of our vehicle**
- mud guards + door edge guards + wheel locks + moon roof visor
- Kensun HID Headlights 35w 5000k with Relay Harness
- MaxLiner floor liners (very pleased)
- DIY clear 3M headlight protectors
- DIY clear 3M rear bumper applique / protector
- white LEDs for reverse lights + cabin lights
") but thank you for knowledge drop.
but thank you for knowledge drop. 


