
DIY guide to install the OEM splash guards for the 4th gen Pilot.
Followed the steps from the Honda Instructions.
Part #08P00-T90-100
Tools Required:
![]()
Front Steps
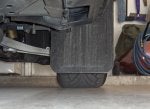
Start with the FR-L side and turn the steering wheel fully counter-clockwise.
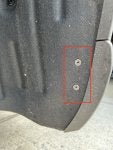
Pierce the
![]()
Remove the existing screw (note this is not needed and can be discarded):
![]()
Place the splash guard firmly, aligned with the holes and install the screws in order. I first loosely tightened all the screws and then tightened in order. Remember to apply some pressure when tightening so it is flush against the body. If its not flush, loosen and position again:
![]()
Turn the steering wheel fully clockwise and repeat the above steps for the FR-R side. Then move on to the rear
Rear Steps
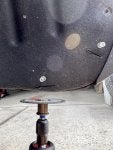
Remove the wheel if you don't have any angled tools that will let you loosen and then tighten screwed in the space between the liner and the wheel.
Remove the 2 existing screws (they are not needed anymore and can be discarded)
![]()
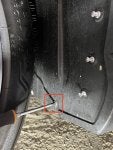
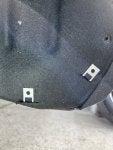
Note the 2 pairs of holes/slits. You need to pierce the 2 holes above each of the slits. Then using a cutting tool, cut against the slit for the bigger spring nuts that will slide through them. I made my holes bigger than I needed to. They just need to be big enough for the spring nuts to pass through.
![]()
![]()
Slide the bigger spring nuts (there's 2 types in the included hardware) into the slits. The side that is flush with the bigger hole needs to face outward. You might need a pry tool to maneuver it in.
![]()
Install the smaller spring nut onto the rear splash card with the flush side (with the bigger hole) facing downward.
![]()
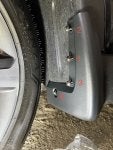
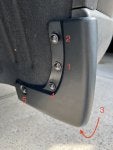
Install the rear splash guard in the following order. Remember that the extension where you installed the smaller spring nut needs to go over the bumper. Also same as in the front, apply pressure when tightening down so the splash guard is flush with the bumper.
![]()
Re-install the wheel if needed and you are done! Hope this helps someone.")
Followed the steps from the Honda Instructions.
Part #08P00-T90-100
Tools Required:
- Splash Guard set (includes hardware)
- Phillips Screwdriver
- Something to cut the liner. I used a rotary tool but looking back at it a utility knife would have been enough
- Tools to remove the rear wheels OR some kind of stubby or angled screwdriver to remove/install the screws

Front Steps
Start with the FR-L side and turn the steering wheel fully counter-clockwise.
Pierce the
3 preinstalled clips: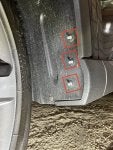
Remove the existing screw (note this is not needed and can be discarded):
Place the splash guard firmly, aligned with the holes and install the screws in order. I first loosely tightened all the screws and then tightened in order. Remember to apply some pressure when tightening so it is flush against the body. If its not flush, loosen and position again:
Turn the steering wheel fully clockwise and repeat the above steps for the FR-R side. Then move on to the rear
Rear Steps
Remove the wheel if you don't have any angled tools that will let you loosen and then tighten screwed in the space between the liner and the wheel.
Remove the 2 existing screws (they are not needed anymore and can be discarded)
Note the 2 pairs of holes/slits. You need to pierce the 2 holes above each of the slits. Then using a cutting tool, cut against the slit for the bigger spring nuts that will slide through them. I made my holes bigger than I needed to. They just need to be big enough for the spring nuts to pass through.

Slide the bigger spring nuts (there's 2 types in the included hardware) into the slits. The side that is flush with the bigger hole needs to face outward. You might need a pry tool to maneuver it in.
Install the smaller spring nut onto the rear splash card with the flush side (with the bigger hole) facing downward.

Install the rear splash guard in the following order. Remember that the extension where you installed the smaller spring nut needs to go over the bumper. Also same as in the front, apply pressure when tightening down so the splash guard is flush with the bumper.
Re-install the wheel if needed and you are done! Hope this helps someone.