Honda Pilot - Honda Pilot Forums banner

Honda Pilot replace door lock actuator rear door

180K views 72 replies 48 participants last post by  plplplpl  
#1 · (Edited)
I replaced three of these actuators (2 front and 1 rear) over the weekend on a 2003 Pilot.

Expect to set aside at least 1-2 hours on the first replacement, lesser time on the ones afterwards. Be careful not to push parts in directions that they shouldn't be pushed in. Don't break any plastic parts/metal rods or connections - take your time.

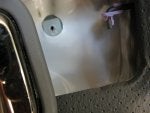
1. Remove the plastic tab under the inner door latch.
2. Open the 2 small black colored screws.
3. Carefully swing the door latch attachment out by moving it down and out. Remove the rod and the electrical connection - there's a slot to press and pull-out.
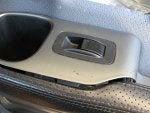
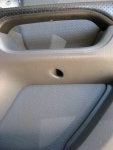
4. Use a flat screw driver to carefully pry the window opening plastic area (its one piece and includes the cup holder). Remove the electrical connection - there's a slot to press and pull-out. Open the screw beneath the arm rest.
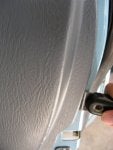
5. Use a flat tool (I used a metal putty 5-in-1 tool) to slide between the door metal and plastic areas - pull the plastic buttons/connections off, you'll hear them pop. Slide the door out.
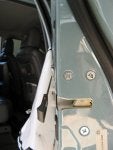
6. Gently open the white plastic sheet about a quarter of the way from the top right down so you can reach in the actuator area (near the door latch - at the end of door with 3 screws). Open the window guardrail, if its in the way - use a 3/8 bolt.
7. Use correct amount of force, without stripping them, open the 3 screws at the door latch.
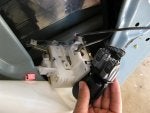
8. Take a good look at the connections inside. Open the electrical connections (two of them) on the lock actuator.
9. Gently but forcefully (without breaking any plastic or other parts), push the metal connectors back and carefully remove the door lock actuator assembly from the door.
10. Replace with new actuator and assemble in reverse.

To Yeshua be the Glory!
 

Attachments

#4 ·
Just look it up on HondaPartsNow.com. This way you can either search by your vehicle specific info, or even your vin number. Sometimes they change things and part numbers could be different from one year to another

It's a very good site to look stuff up on...

Once you have part numbers, you can order parts with free shipping over on G1Parts.com. It's another Honda dealership, but their website is very hard to find parts on if you don't have the part number.
 
#5 · (Edited)
Guys,
Just got done replacing the right rear actuator on my '04 Pilot EX. It took a little over an hour to do.
The hardest part was getting the three screws loose that hold the actuator to the door.
I used an impact driver after I tried a #3 philips head unsuccessfully.

For anyone doing the job and wanting to get an aftermarket piece Standard Ignition
DLA129 is the correct part # for the RR door. Even though it says LX model only it fits the EX just like OE. It can be had for under $30.00.

Jeff
 
#7 ·
I just joined the forum after reading this write up. I want that Ikb179.

I just completed this replacement on the right front door. Your description and pictures were a perfect guide. Dealer wanted $330-$365 to do it. I ordered online and it came to $51 with shipping and handling.
Thanks again
 
#8 ·
Actuator replacement

I'm in the middle of my replacement, and it is a lot tougher (for me, anyway) than it seemed. Finally got the acuator out, and when I went to replace it with the new one, the brass plate mechanism on the latch separated from the latch body, and I have no idea how it goes back together (see attached photo). I have two more to replace. Can anyone help, or is it time to turn it over to the dealership and eat crow (and a bunch of money)?
 

Attachments

#10 ·
removing the three screws is a PITA and easily said than done. no amount of screwdriver design or shape can remove it once tightened. that is why, I just drill the head out and remove the base each time I do it.
 
#11 ·
Figured it all out

Finally got mye two rear actuators replaced. I had to remove the left side one to make sure I put the right side one back together correctly after it fell apart during repalcement, then continued with the left side replacement. As for the three screws holding the latch to the door, after reading these posts (and nearly stripping the first screw with a #2 phillips head screwdriver), I went to Home Depot and purchased a #3 phillips bit ($4) and a Ryobi impact drill/driver ($69). I sprayed some WD 40 onto the screw heads, let it seep in for a minute, and pushed hard on the screw with the impact drill and let it do its magic. Took about 5 seconds for each screw, but they then came out easlily. Never using an impact drill before, but am now a convert. First actuator took about three hours to replace, next two about 35 minutes each. My thanks to the original poster for the pictures and tips; I would be glad to help with any insights I learned if anyone is attempting the replacement of the actuators (front and back).
 
#39 ·
Yes, Please....

Finally got mye two rear actuators replaced. I had to remove the left side one to make sure I put the right side one back together correctly after it fell apart during repalcement, then continued with the left side replacement. As for the three screws holding the latch to the door, after reading these posts (and nearly stripping the first screw with a #2 phillips head screwdriver), I went to Home Depot and purchased a #3 phillips bit ($4) and a Ryobi impact drill/driver ($69). I sprayed some WD 40 onto the screw heads, let it seep in for a minute, and pushed hard on the screw with the impact drill and let it do its magic. Took about 5 seconds for each screw, but they then came out easlily. Never using an impact drill before, but am now a convert. First actuator took about three hours to replace, next two about 35 minutes each. My thanks to the original poster for the pictures and tips; I would be glad to help with any insights I learned if anyone is attempting the replacement of the actuators (front and back).
Chuck, what did you find out when you compared the left side with the right side? I realize it has been a while, but I'm where you were at with the metal pieces coming apart while changing out the locking actuator. I'm stumped. Any help would be appreciated.
 
#12 ·
Did you take a picture by chance of the put together door lock? I did the same thing on my 2003 Pilot. I had 3 locks go out (not all at once), both driver sides and the front passenger. The locking mechanism came apart on the rear driver side. Went on to the front driver side which was a piece of cake, but NOT the same parts. DO not want to take apart rear passenger as it is not broken (yet) but I do not have a replacement part at the moment. Sill keep looking for a picture or diagram. Thx!
 
#16 · (Edited)
Yeah, they canceled that the 1st of this year. I e-mailed them about it, but they ignored me. :(

Right now the best one going is www.OEMAcuraParts.com. They sell both Honda and Acura parts so you can order everything together if you own both brands like me (only some parts cross over to both brands). If you use coupon code "GALAGA" you get 50% off shipping over $20. If you order over $500 you get free shipping with coupon code "SPYHUNTER". Plus they price match anybody else. Contact Tim or Denis on the website for price matching.
 
#17 ·
I have read and researched and watched You Tubes ad nauseum on this operation of replacing an actuator, especially the part about the dreaded three latch screws. SO - I took my little DeWalt impact driver (battery operated) and put a number 3 "Reed Prince" bit in it and they came out without any issue. Every post I have seen has said they are "Phillips" screws - they are not. A Reed Prince differs from a Phillips in that it doesnt have a sharp point on the end. Using a Phillips holds the gripping part of the bit away from the shoulders of the screw.
 
#18 ·
actual removal of actuator

I have everything done except for the physical removal of the actuator. I seem to be missing something here - I had trouble with the 3 screws, but I did get them out... what is next, I think the actuator is just the black piece, but I can't seem to get that off of the white piece?? any help would be greatly appreciated!! thanks
 
#19 ·
Just replaced my RR actuator. I'll share my tips.

First of all... ARGH that I didn't find this earlier. My RR was the last to go out, I could have saved like 750 bucks.

The instructions are very helpful. The areas that I'll comment on are where I found some difficulty. This applies to right-rear only. Not sure if fronts are different.

1) Everything went very smooth. I used a heat gun and break-free, and the 3 screws holding the assembly came out with ease. Make sure you have a #3 phillips, no need on stripping screws because of wrong tool.

2) You will have to unclip and detach all rods which connect the external door handle, internal door handle, and door lock. Take notes on how these connect back up. And remember to re-connect :) (see below)

3) Removing the assembly is the biggest problem. The OP's notes say to remove door bracket. I must be crazy but in my 04 there was no bracket I could remove. It was solid piece all the way to top of window. I had to do some geometry to get the assembly out. In a nutshell, rotate it south, then twist it around the bracket. Be careful. It will come out though.

4) When you get the assembly out. Be careful. I can see if you aren't paying attention you can send parts flying and not know how to put it back together. Use your camera phone to take picture before you take it apart. Once you have it out, and see how it works, replacing the actuator is easy.

5) Be careful on the re-assembly. I'm normally careful and I forgot to connect the external door latch rod :)

Thanks to OP for this thread. Although I regret paying dealer to replace first 3 units, I saved $250 in labor and it was 90 minutes. If I had to do it again I could probably hit 45 minutes, and I'm not a mechanic.

2004 Pilot EX, door actuators are the only thing that has broken. Love my Pilot.
 
#21 ·
Need your help with actuator

Okay, I'm trying to replace my 2003 Pilot's driver's door actuator. The instructions in this thread have been very helpful, but I still need help!!

I was able to get access by removing the door panel, etc. Even got the 3 door latch screws out without too much problem. (used a #3 Phillips head bit on an 18" breaker bar.) I removed the window channel and disconnected the 2 electrical connections to the actuator. But, then I couldn't figure out how to get the door latch/actuator actually out of the car. How do I disconnect the wire latches that connect to the door lock and the door handle? And it seemed like something else was connected to it as well. It's tough to see in there and I was afraid to pull too hard on the metal rods as to not break anything. After an hour, I gave up and put everything back together.

Can someone give me instructions on what has to be physically disconnected from the lock/actuator assembly to get it out of the car? And, how to disconnect them? Those plastic clips that hold the metal connecting rods look pretty fragile. I tried and tried, but for the life of me, I couldn't get any of them disconnected.

Any help would be much appreciated! And would make me look good in my wife's eyes again!

Vic in NC
 
#25 ·
Okay, I'm trying to replace my 2003 Pilot's driver's door actuator. The instructions in this thread have been very helpful, but I still need help!!

I was able to get access by removing the door panel, etc. Even got the 3 door latch screws out without too much problem. (used a #3 Phillips head bit on an 18" breaker bar.) I removed the window channel and disconnected the 2 electrical connections to the actuator. But, then I couldn't figure out how to get the door latch/actuator actually out of the car. How do I disconnect the wire latches that connect to the door lock and the door handle? And it seemed like something else was connected to it as well. It's tough to see in there and I was afraid to pull too hard on the metal rods as to not break anything. After an hour, I gave up and put everything back together.

Can someone give me instructions on what has to be physically disconnected from the lock/actuator assembly to get it out of the car? And, how to disconnect them? Those plastic clips that hold the metal connecting rods look pretty fragile. I tried and tried, but for the life of me, I couldn't get any of them disconnected.

Any help would be much appreciated! And would make me look good in my wife's eyes again!

Vic in NC
In case you still have to do this, I found that if you turn the clip approx 90 degrees the rod always pushed out easily.
 
#24 ·
Just completed the the right front and right rear doors. It took a couple of hours. Fiddly, sometimes you need an extra hand, but not too difficult. At first I didn't think I'd remember where all the rods connected to but it was all pretty logical.

I was a little surprised that the three screws came out easy and the inside of the doors looked like they'd been worked on. Then I remembered we'd had body work done on that side a few years ago after a crazy driver hit us from the rear and scraped himself all down that side.

Thanks for all the write ups guys, my wife is happy to have all doors centrally locking and unlocking.

btw I also have a door handle that doesn't spring back into place when opened. The door opens and closes and locks and unlocks but I suspect there's a spring broken inside somewhere. Anyone have a "how to"? Does that sould like I need a whiole new door handle?

Thanks guys
 
#26 ·
2007 pilot - rear right door lock actuator replacement tips

I replaced the rear right door actuator on one of my two 2007 exl res pilots today. Big thanks to all the contributors who paved the way. These comments are meant to be supplemental to what's already here.

Dealer wanted $366 incl tax. I got OEM part # 72115-S6A-J01 (right rear) via 3-day fedex from OEMAcuraParts.com for $65 incl tax/shipping. $301 remains in my pocket. (left rear actuator for my pilot is a diff part number: 72155-S5P-A11... and $10 cheaper for some reason.) If you choose, for only about $10 more each, you can buy the entire lock/actuator mechanism already assembled... guess that saves you not having to worry about the mechanism coming apart as you replace the actuator, but it's really not that bad. I went with just the actuator.

This was only my second "moderate" (for me) auto maint task (I previously changed a broken foglight-- sounds simple, but removing the entire bumper cowling to get to it kinda freaked my wife out). I'd put the actuator replacement as a 7/10 for difficulty and the foglight as a 4/10 (if you attempt the foglight, buy the right clip removal tool online!) I'm handy when it comes to home reno stuff, but never do much auto mechanical.

My observations:

Tools: all I really used was my cordless impact driver (see below), large and small phillips screwdriver, small flathead screwdriver, and a flashlight. Also a plastic door trim removal bar (suggest buying a trim removal kit-- they're cheap and handy for removing interior trim that you don't want to scratch)-- but a rigid putty knife would probably work as well.

1. removing the lock arm/bar from the inside door handle/opener: highly recommend flipping your child safety lock to ON (located inside the doorjam near the 3 lock mechanism screws). This extends that arm another 1/2" toward the handle, making it much easier to take apart and reassemble. I also suggest taking pics of the way all the arms attach to each of the various components (the inside handle, the lock knob, and up inside the door where the exterior handle connects.)

2. removing the cupholder/window control piece... I pulled on the inside of the cup holder and it popped out easily. Disconnect the window switch wirebundle and set the piece aside.

3. I removed the vapor barrier plastic very slowly keeping the rubbery caulk stuck to the plastic... some videos on youtube show the tech ripping the sucker down... but if you go slowly, it won't tear and the caulk still had enough tack to reseal it nicely. So go easy. Like others, I pulled it about 1/3 down, starting from the upper corner near the "lock knob"

4. Initially, I removed the 3 lock mechanism screws before removing the arms, but ended up putting the lock screws back in so I wouldn't have to hold the assembly inside the door. So I say disconnect all the arms and wires from the lock/act mech first.

5. the arm connecting to the exterior door handle was toughest for me to get disconnected... it is way up inside the door and tough to get your hand in there. Like the other arms it separates up where there's a white (in my case) plastic connector from the end of the arm to the ext handle mechanism. If flips open like the pink ones on the other components. The rest of the arm stays connected to the lock assembly.

6. I completely removed the arm that goes from the int handle to the lock mech. But photographed the position before removing the arm at the lock side, so I'd get it back together correctly. Good thing they have a little round window for you to look through as you're reconnecting.

7. re: the dreaded "3 lock screws" that come installed very tight from the factory... I used my 18v cordless DeWalt impact driver. That was the right tool for the job. Piece of cake with this and a #3 phillips.

8. to get the lock/actuator assembly out of the door, I did NOT remove the bolts to the window track, but DID have to separate the longish white plastic "door rod protector" piece (that guides the knob arm) from the lock/actuator assembly. Like other folks, it then took some time to figure out how to rotate the sucker around to get it out. Bit of a puzzle. In the end, mine went pretty much straight down staying on the inside (toward interior of car) of the window guide rail.

9. like others have said, be VERY careful when separating the actuator from the lock mechanism. I strongly rec taking lots of pics from different angles before you start fiddling with it. And bring it inside, so if someting falls apart you don't lose anything. Like others, I removed the one screw and removed the silver plate very very carefully (so the child safety rocker didn't come apart.) Use your small flathead screwdriver for this. Then you'll be able to separate your dead actuator and put the new one on.

Victory! Now reassemble then crack a cold one. Good luck.
 
#27 ·
I had the rear passenger lock on my 2003 Pilot EXL fail. I purchased a new actuator, and did pretty well until I got to the part of actually getting the mechanism out of the door. Once I got it out I had the unfortunate experience of having the child lock mechanism come apart - and I had no pictures. After a couple of hours I figured out how to put it back together. The Honda diagrams were worthless. So to save someone else the trouble, here are some pictures of the working mechanism.

Image


Good Luck!
 
#28 ·
@dwains It doesn't look like your photo got attached? I think having a couple photos of the working mechanism would be invaluable to this thread.

My friend and I replaced my rear right door actuator on my '03 Pilot last night. Those 3 screws came off fairly easily with using a hair dryer on each one for a little over a minute on each one. Just let the screws fall to the ground as they are going to be hot. Getting the assembly out is difficult at first. The next part can not be overstated ... once the assembly is coming out put all your hands on it and your friends hands to make sure the parts don't fall/shoot everywhere. Then carefully set it down and take lots of photos. Our parts fell apart everywhere. Had everything stayed together the project would have taken 90min, but we had to figure out how all the gears worked together. So the final project took just over 2.5 hours. My friend got very good and taking out and putting back in the assembly to test if the gears were configured correctly. If you're not mechanically minded then you will likely give up when the gears fall apart and then take it to the dealer to be careful. My friend and I as a team could probably do a future door in 40min. I would never want to tackle this project alone. I'm sorry we didn't get photos of the assembly. After 2.5 hours of beastly hot temps in my garage we were just happy to be wrapping up the project. I bought the passenger rear door lock actuator from Rock Auto for $28.79. Part number: 746301 (746-301).
 
#30 ·
Just replaced both passenger side actuators today. The hardest part was getting the three screws out - I bent the sheet metal & had to bend it back once I got them out. Now the locks work fine!
 
#31 ·
I replaced my RR this week but instead of just the actuator I replace the latch assembly witch comes with the actuator, no need to take the latch apart to replace the actuator and the price was only $20.00 more. Three screws were soaked with WD-40 for an hour and they were no problem coming out.
 
#32 ·
'03 Pilot. I didn't see all the tips here regarding the screws prior to diving into this project. Stripped the screws (used a Reed Prince, but apparently the screws are in tighter than t-shirts at a gym), so I went out and bought a impact driver, and screw extractors. First screw: extractor broke off inside the screw.

Fast forward: I've now purchased a titanium-plated drill bit set, along with another set of screw extractors. First screw: tried drilling through the previous bit (no way it's coming out), but not making much progress. Second screw, got the Grabit bit to go in, but now there's a nice gaping hole and screw is still not out.

It might be that the winter weather here (DC), coupled with some stupid luck and lack of experience have put me in this situation, and I'm now seriously debating my next steps. I did purchase a heat gun, so that's next on the list. I've tried JB and WD40 to no avail, and I'm just hoping that I'll have some better luck tomorrow :(.