Any luck with this? Looking to do a replace as there is a hole in mine.
• Take care not to scratch the door and related parts.
• When prying with a flat-tip screwdriver, wrap it with protective tape to prevent damage.
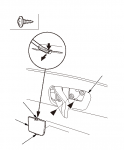
1. Using a flat-tip screwdriver wrapped with protective tape, push on the upper lock tab (A) and pivot the inner handle cap (B) on the bottom tab (C), then remove the cap and the screws securing the inner handle (D).
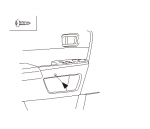
2. Remove the screw.
3. Remove the mirror mount cover.
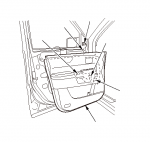
4. Remove the door panel (A) with as little bending as possible to avoid creasing or breaking it.
4-1 Start at the bottom edge of the door panel, release the clips with a commercially available trim pad remover.
4-2 Detach the upper clips.
4-3 Starting at the rear, pull the door panel upward.
NOTE: The inner handle cable (B) and the latch cable (C) are connected to the inner handle (D). Do not pull the door panel up too far, or these cables will be damaged.
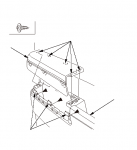
5. Remove the inner handle (A) from the door panel:
5-1 Hold the door panel (B) away from the door.
5-2 Pull on the front of the inner handle to detach the first clip. Keep pulling until the rest of the clips are detached, then remove the handle.
6. Driver's side, disconnect the power window switch connector (A), the power mirror switch connector (B), the door subharness connector (C). With DPMS: Disconnect the power mirror connector (D) and the harness clip (E). Passenger's side, disconnect the power window switch connector (F), the courtesy light bulb socket (G), and detach the harness clip (H) from the panel.
7. Remove the door panel (I).
NOTE: If you are only removing the door panel, go to step 11. If you are doing further disassembly, proceed to step 8.
9. (skipped step eight as we only want to remove the armrest) If necessary, remove the screws from the back of the door panel (A) and release the hooks (B), then remove the armrest (C).
11. Install the door panel in the reverse order of removal, and note these items:
• If the clips are damaged or stress-whitened, replace them with new ones.
• Replace any damaged cable fasteners with new ones.
• The latch cable (A) should be fixed to the cable fastener (B) with the latch in the locked position as shown.
• Make sure the connectors are plugged in properly, and the cables are connected securely.
• Do the power window control unit reset procedure .
• Make sure the window and the power door lock operates properly.
• When reinstalling the door panel, make sure the plastic cover on the door is installed properly.
Resetting the Power Window Control Unit
1. Turn the ignition switch to ON (II).
2. Move the power window all the way down by using the power window DOWN switch.
3. Open the driver's or front passenger's door.
4. Do the following four times before going to step 5 :
NOTE: Do each bullet step within 5 seconds of each other.
• Turn the ignition switch to LOCK (0).
• Push and hold the driver's power window DOWN switch.
• Turn the ignition switch to ON (II).
• Release the driver's power window DOWN switch.
5. Confirm that AUTO UP no longer works. If AUTO UP still works, repeat step 4 , paying close attention to the 5 second time limit.
6. Move the power window all the way down using the power window DOWN switch.
7. Pull up and hold the power window UP switch until the power window is all the way up, then continue to hold the switch for several seconds.
8. Confirm that the power window control unit is reset by using the power window AUTO UP and AUTO DOWN function. If the power window still does not work in AUTO, repeat the procedure several times, paying close attention to the 5 seconds time limit between each bulleted step. If window still does not work, troubleshoot the power window circuit.
GOOD LUCK!!!